There’s something deeply satisfying about making pizza outdoors—crispy crust, smoky aroma, and the crackling sound of fire. Building your own backyard brick pizza oven may sound complex, but with a bit of planning and patience, it’s an incredibly rewarding DIY project. Here’s how to create a functional, wood-fired oven using basic materials.
Materials You’ll Need
- Fire bricks (for the inner oven floor and dome) – approx. 80–100
- Clay bricks or cinder blocks (for outer structure and base)
- Fireclay or refractory mortar
- Cement and sand (for the foundation)
- Insulating material (e.g., vermiculite, perlite, or ceramic blanket)
- Steel or brick chimney flue
- Level, trowel, shovel, rubber mallet, gloves
Step-by-Step Instructions
1. Choose and Prepare the Location
Pick a flat, dry spot in your yard with good airflow and no overhanging trees. Make sure it’s at least 3 meters from any structure.
2. Lay the Concrete Foundation
Dig a rectangular base (~120 × 120 cm), about 10–15 cm deep. Fill with gravel and pour a concrete slab. Let it cure for 24–48 hours.
3. Build the Base
Use cinder blocks or bricks to build a sturdy square base, about 80–90 cm high. Fill the inner cavity with gravel or sand for stability.
4. Create the Fireproof Oven Floor
Lay fire bricks flat and tight within a sand bed on top of the base. Use a level to make sure the floor is smooth—this will be your pizza surface.
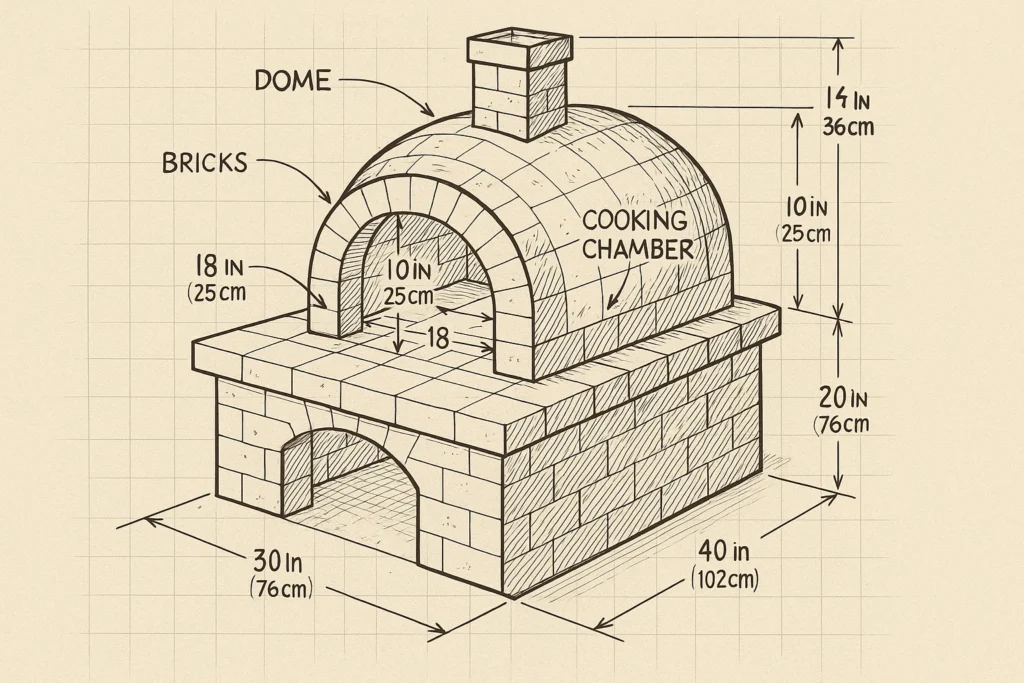
5. Shape the Dome (Dry Fit First!)
Use fire bricks to form a semi-circular dome. A common method is to use a wooden dome mold or sand mound to support the arch as you build. Use fireclay mortar between the joints.
- Opening height: approx. 63% of the dome height (for best heat flow)
- Door width: ~40 cm wide is ideal
6. Add Insulation
After the dome is set and dried (1–2 days), wrap it with ceramic insulation blanket or apply a thick layer of vermiculite mortar. This keeps the oven hot for longer.
7. Build the Chimney
Place the chimney flue just above the front opening, not at the top of the dome. This helps draw smoke out while keeping heat in.
8. Apply Outer Shell (Optional)
Finish the oven with a decorative layer of stucco, brick, stone, or mosaic tiles for weather protection and aesthetics.
First Fire and Curing
Start small fires over several days to cure the structure—this removes moisture and prevents cracking. Gradually increase fire size over a 5-day period.
Ready to Bake
Once fully cured, your oven can reach 400–500 °C—perfect for Neapolitan pizza in just 90 seconds. But it’s also great for baking bread, roasting vegetables, or even slow-cooked stews.
Tips for Success
- Always wear gloves and eye protection during construction.
- Don’t skip insulation—it’s the key to efficiency.
- Use a pizza peel and infrared thermometer for best results.
- Cover your oven in winter to protect from frost and water damage.
Disclaimer:
This construction guide and design sketch are provided for informational and inspirational purposes only. Any attempt to build this pizza oven is undertaken at your own risk. Always consult local building codes, fire safety regulations, and structural requirements before beginning construction. If in doubt, seek professional advice or approval from your local authority. The creators of this guide accept no liability for injury, damage, or loss resulting from the use or misuse of the information provided.

